Excursion App Promotion
In this project, I created a web page which advertises a product called “Excursion.” I used my growing toolset including HTML, CSS, Command Line Interface, Git, and GitHub. The web page I built advertises a mobile app which helps users record and share their experiences, so I used video and landscape imagery to set the scene. A landing page is a vital tool in marketing a product these days, and the goal will be to entice potential customers into using the product. The main task for this project was to practice GIT commands, so I added, committed, merged and fetched everything using the terminal for pracise as opposed to using the side bar in visual studio code.
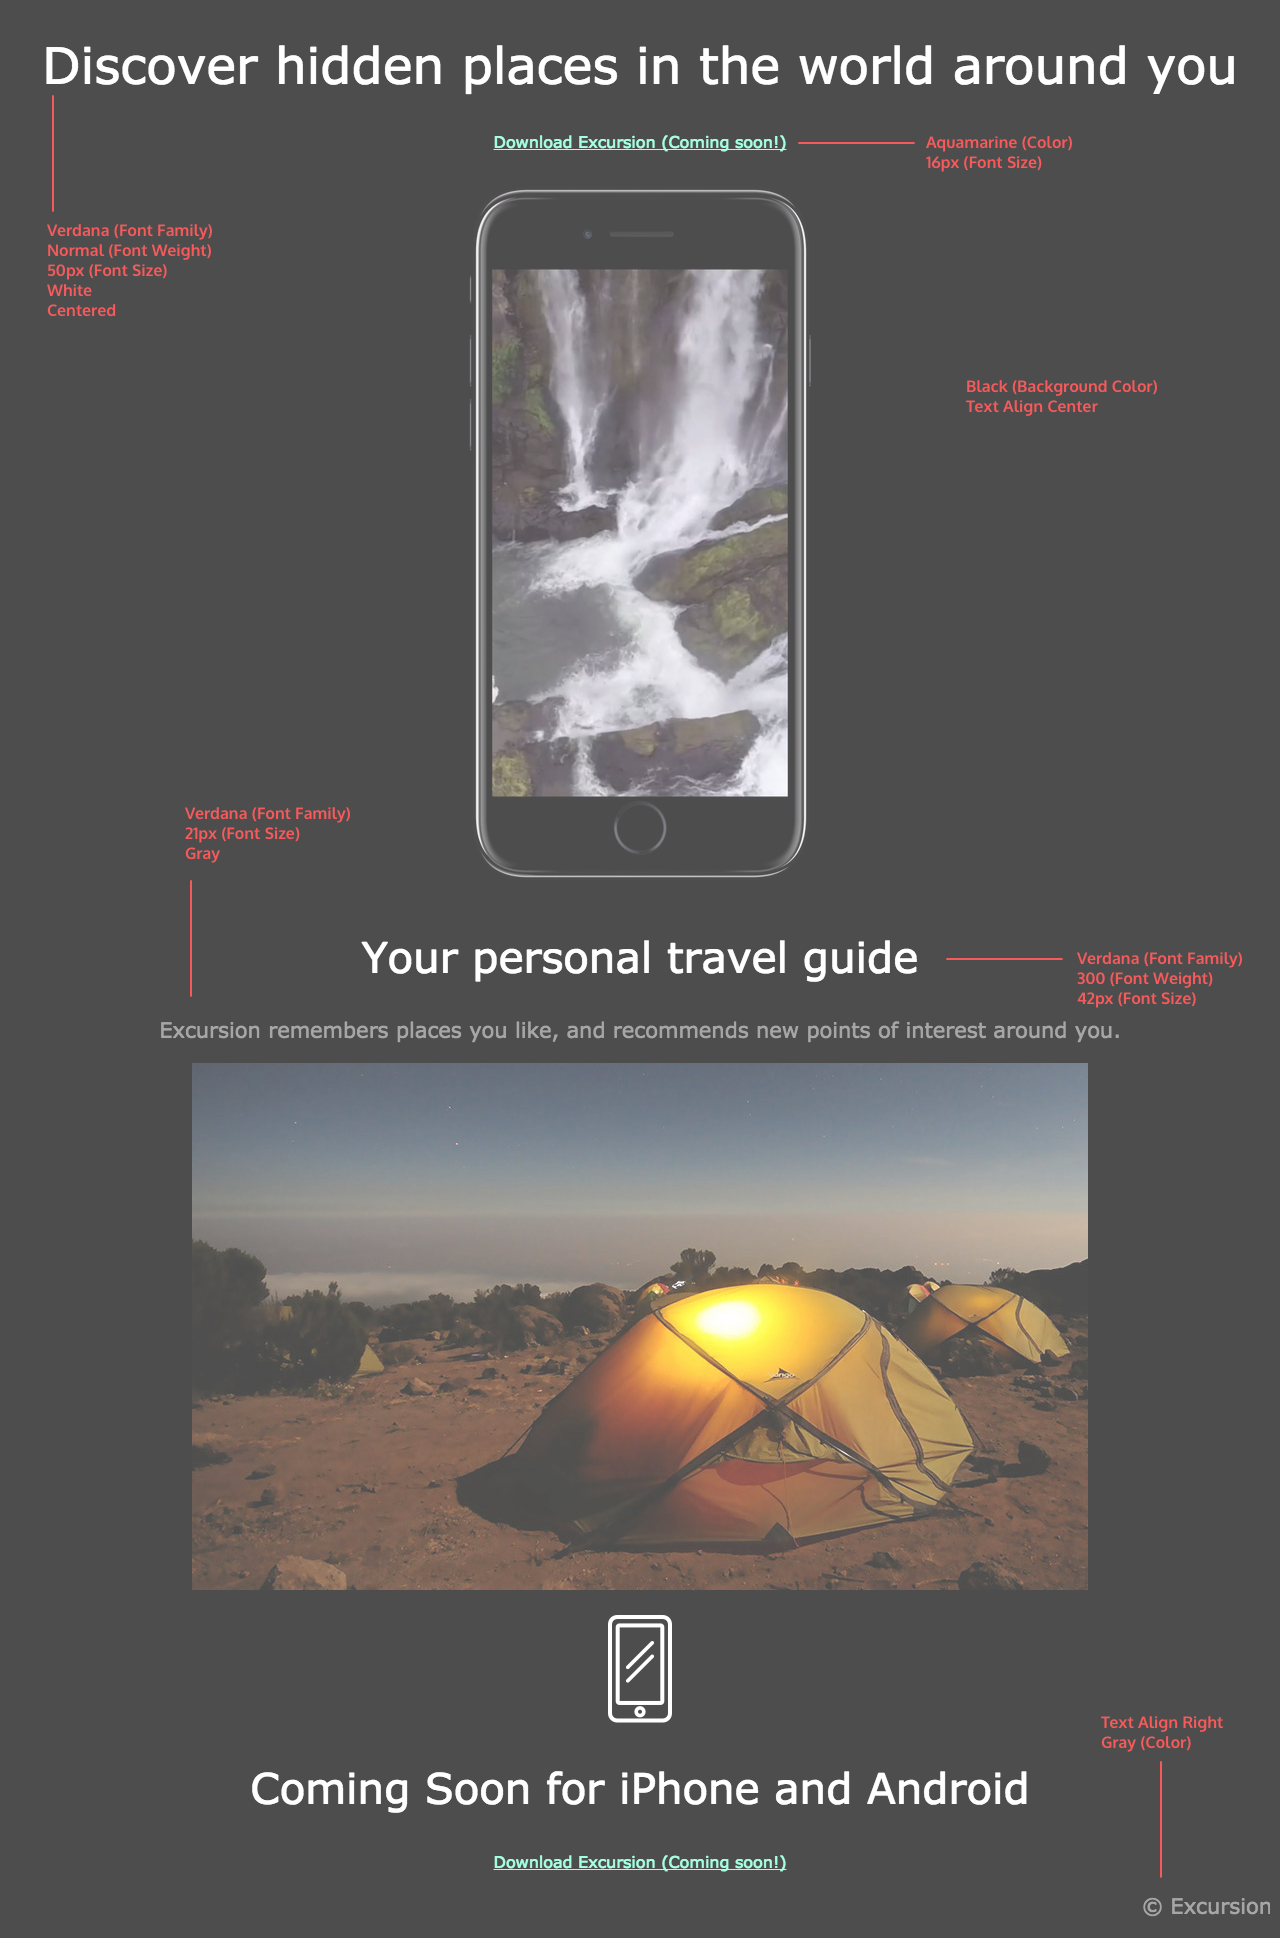
At the beginning of the project I was given this redline (click to enlarge) of how the owner would like it to be designed, and it's my job to make their dreams a reality.
Below you will find the steps I took to make the web page and here is the link to the finalised website page.
Method
HTML code
The first thing I needed to do was the right the html code for the website ensuring that everything was there. In the header section I was sure to link the CSS stylesheet for the web page.
    <t!DOCTYPE html>
    <html lang="en">
    <head>
        <link rel="stylesheet" href="excursion.css">
        <title>Excursion App Promotion>/title>
    </head>

    <header>
        <h1>Discover hidden places in the world around you</h1>
    </header>

    <body>
        <main>
            <div>
                <h1>Discover hidden places in the world around you</h1>
                <a href="#">Download Excursion (Coming Soon!)</a>
                <video autoplay muted loop src="resources/excursion.mp4">Example of app</video>
            </div>

            <div>
                <h2>Your personal travel guide</h2>
                <p>Excursions remembers places you like, and recommends new points of interest around you.</p>
                <img src="resources/camp.jpg" class="camp" />
            </div>

            <figure>
                <img src="resources/phone.png" class="littlephone" />
            </figure>

            <div>
                <h2>Coming Soon for iPhone and Android</h2>
                <a href="#">Download Excursion (Coming Soon!)</a>
            </div>
        </main>

        <footer>
            <p>© Excursion</p>
        </footer>
    </body>
</html>
I added classes onto the images to that I could style them individually. I also ensured that the video played automatically, muted and on a loop so that it was engaging for the user. Addditonally, I used self closing tage for images as this was a new thing that I has learnt.
CSS Styling
After ensuring the content was including in the HTML file, I then turned to the stylesheet to match the redline given.
The first thing I did was style the background and headers on the page.
    body {
        background-color: black;
        font-family: 'verdana', sans-serif;
        text-align: center;
    }

    h1 {
        font-weight: normal;
        font-size: 50px;
        color: white;
    }

    h2 {
        color: white;
        font-weight: 300;
        font-size: 42px;
    }
Next, I styled the divs in order to make sure they were in the column direction.
    div {
    display: inline-flex;
    flex-direction: column;
}
My next step was to style the text and the links so they matched the redline. I make the download into a link, even though currently it does not go anywhere. This will make adapting it later a lot easier.
    a {
        color:aquamarine;
        font-size: 16px;
        text-decoration: underline;
    }

    p {
        color: grey;
        font-size: 21px;
    }
Then, I looked at the images and video to ensure they were the correct size and shape. I took a little artistic licence on the camp picture and added a glow effect to match the imagary.
    video {
        height: 600px;
    }

    .camp {
        box-shadow: 0 0 50px 10px rgba(231, 189, 4, 0.2);
    }

    .littlephone {
        width: 80px;
    }
Finally, it was time to style the footer.
    footer {
        text-align: right;
        color: grey;
    }